How to create a new tattoo: differenze tra le versioni
| Riga 77: | Riga 77: | ||
#:[[File:Ts3_tut_createTattoo_07.jpg|none|thumb|600px|Esempio di attributi]] | #:[[File:Ts3_tut_createTattoo_07.jpg|none|thumb|600px|Esempio di attributi]] | ||
#: | #: | ||
| − | # | + | # The new project has been created. Click on OK to confirm. |
#: | #: | ||
#:[[File:Ts3_tut_createTattoo_08.jpg|none|thumb|600px|Conferma creazione del file]] | #:[[File:Ts3_tut_createTattoo_08.jpg|none|thumb|600px|Conferma creazione del file]] | ||
#: | #: | ||
| − | # | + | # The version of [[TSR Workshop]] used for this tutorial doesn't manage tattoos, so ''it's normal to see no previews'', as shown in the picture. You'll have two tabs, and in the first one you can see the tatto's properties. |
#: | #: | ||
#:[[File:Ts3_tut_createTattoo_09.jpg|none|thumb|600px|Proprietà ]] | #:[[File:Ts3_tut_createTattoo_09.jpg|none|thumb|600px|Proprietà ]] | ||
#: | #: | ||
| − | #: | + | #:Since they're tattos, '''we suggest you to leave everything as it is''' - (categories and ages), but if you want to create tattoos for females or males only, or that don't appear for formal outfits, you are free to try ''(we didn't tested these options)''. |
#: | #: | ||
| − | #: | + | #:What you can do is '''adding a custom preview pictures used by the [[The Sims 3 Launcher|launcher]]'''. We usually create it by placing the tattoo picture and our logo, plus the Workshop symbol, as you can see in the picture. |
#: | #: | ||
#:[[File:Ts3_tut_createTattoo_tsr_launcherPrev.jpg|link=]] | #:[[File:Ts3_tut_createTattoo_tsr_launcherPrev.jpg|link=]] | ||
#: | #: | ||
| − | # | + | # By clickin on the dots, you can select a picture - we suggest a '''128x128 size''' or anyhow a '''squared shape'''. The '''JPG''' format is perfect, especially if you use options like Save for the web, that reduce the image's size. |
#: | #: | ||
#:[[File:Ts3_tut_createTattoo_10.jpg|none|frame|Inserire una preview personalizzata per il launcher ]] | #:[[File:Ts3_tut_createTattoo_10.jpg|none|frame|Inserire una preview personalizzata per il launcher ]] | ||
#: | #: | ||
| − | #: | + | #:Once uploaded, you should have something like this: |
#: | #: | ||
#:[[File:Ts3_tut_createTattoo_11.jpg|none|frame|Inserire una preview personalizzata per il launcher ]] | #:[[File:Ts3_tut_createTattoo_11.jpg|none|frame|Inserire una preview personalizzata per il launcher ]] | ||
#: | #: | ||
| − | # | + | # Now we can go to the most interesting part, the one of '''''designs and colors''''', that is the '''Texture''' tab. |
| − | #: | + | #:Each default file is usually available in three versions. In this tab you'll be able to select the other 2 and then click on the '''X''' button to remove them or the '''Copy''' button to add more. |
#: | #: | ||
#:[[File:Ts3_tut_createTattoo_12.jpg|none|frame|Aggiungere o eliminare il numero di stili disponibili ]] | #:[[File:Ts3_tut_createTattoo_12.jpg|none|frame|Aggiungere o eliminare il numero di stili disponibili ]] | ||
#: | #: | ||
| − | # | + | # Now we'll see how to modify the design and change its colors. Keep in mind that these steps must be done for each style - if you keep the file as it is you'll have to do this 3 times, if you add a style 4 times and so on. |
#: | #: | ||
| − | # | + | # If you expand the '''Core''' tab you can find the picture in DDS format. |
#: | #: | ||
#:[[File:Ts3_tut_createTattoo_13.jpg|none|frame|Inserire una preview personalizzata per il launcher ]] | #:[[File:Ts3_tut_createTattoo_13.jpg|none|frame|Inserire una preview personalizzata per il launcher ]] | ||
#: | #: | ||
| − | # | + | # Click on '''Edit''' and you'll see a mask as the one below: |
#: | #: | ||
#:[[File:Ts3_tut_createTattoo_14.jpg|none|frame|DDS mask da modificare, importare ed esportare ]] | #:[[File:Ts3_tut_createTattoo_14.jpg|none|frame|DDS mask da modificare, importare ed esportare ]] | ||
#: | #: | ||
| − | # | + | # Click on '''Export''' and you'll export the file of the tattoo design in DDS format. You'll have to open and edit it with a graphic program, as explained for patterns. If you want more details about this step, [[Creare pattern grafico|click here]]. |
#: | #: | ||
| − | # | + | # As for patterns, then, each channel corresponds to a recolorable part, up to 4. If you want to use only one channel, leave the remaining ones in black. Export the DDS file in the same format used for patterns, '''8.8.8.8 ARGB 32bpp'''. |
| − | #: | + | #: for example, take a look at how the butterlfy design works on the four channels: |
#: | #: | ||
#:[[File:Ts3_tut_createTattoo_21.jpg|none|frame|Esempio di disegno su 4 canali ]] | #:[[File:Ts3_tut_createTattoo_21.jpg|none|frame|Esempio di disegno su 4 canali ]] | ||
#: | #: | ||
| − | #: | + | #: and how a one-channel design works: |
#: | #: | ||
#:[[File:Ts3_tut_createTattoo_22.jpg|none|frame|Esempio di disegno su 1 canale ]] | #:[[File:Ts3_tut_createTattoo_22.jpg|none|frame|Esempio di disegno su 1 canale ]] | ||
#: | #: | ||
| − | # | + | # Once you've created your design, click on '''Import'''. Then import your new DDS. This step must be done only once, even if you have several styles: for the others you'll have to use the same mask using the '''Browse''' feature, so you can create smaller files. You can also add different designs using different masks and styles, but from CAS you would only see the first style image. |
#: | #: | ||
| − | # | + | # When you import your new DDS you'll get a message like the one below: |
#: | #: | ||
#:[[File:Ts3_tut_createTattoo_15.jpg|none|frame|Confermate di voler importare ]] | #:[[File:Ts3_tut_createTattoo_15.jpg|none|frame|Confermate di voler importare ]] | ||
#: | #: | ||
| − | #: | + | #: Confirm, it's normal, but the format we suggested is the right one. It is also normal you'll see everything as transparent or with only one part showing. You'll see everything ok in the game. |
#: | #: | ||
| − | # | + | # After that, you'll get another message box: |
#: | #: | ||
#:[[File:Ts3_tut_createTattoo_16.jpg|none|frame|Confermate di voler rimpiazzare la texture esistente ]] | #:[[File:Ts3_tut_createTattoo_16.jpg|none|frame|Confermate di voler rimpiazzare la texture esistente ]] | ||
#: | #: | ||
| − | #: | + | #: Confirm again. Here you're asked a confirmation to overwrite the existing texture with your new one. |
#: | #: | ||
| − | # | + | # Now it's time to manage the '''predefined colors and channels to enable or disable'''. |
#: | #: | ||
#:[[File:Ts3_tut_createTattoo_17.jpg|none|frame|Selezionate i colori e canali da attivare ]] | #:[[File:Ts3_tut_createTattoo_17.jpg|none|frame|Selezionate i colori e canali da attivare ]] | ||
#: | #: | ||
| − | #: | + | #: select the colors you want to give to each channel, the in '''Mask info''' select those channels you want to enable or disable. In this example, as in the ''one-channel'' template of the ''plumbob'', only one channel is enabled as there is only one recolorable part. |
#: | #: | ||
#:[[File:Ts3_tut_createTattoo_18.jpg|none|frame|Attivate/disattivate i canali ]] | #:[[File:Ts3_tut_createTattoo_18.jpg|none|frame|Attivate/disattivate i canali ]] | ||
#: | #: | ||
| − | # | + | # Now you're done! '''You are ready yo export your new tattoo''''. In order to do this, go to the '''File→Export&rar;To Sims3Pack''' menu. |
#: | #: | ||
#:[[File:Ts3_tut_createTattoo_19.jpg|none|frame|Esportare in .sims3pack ]] | #:[[File:Ts3_tut_createTattoo_19.jpg|none|frame|Esportare in .sims3pack ]] | ||
#: | #: | ||
| − | # | + | # Before closing the application, we suggest you to save the ''Workshop'' project too, as you may want to add further details to what you've done. To do this, go to the '''File→Save as''' menu. |
#: | #: | ||
#:[[File:Ts3_tut_createTattoo_20.jpg|none|frame|Salvare il progetto ]] | #:[[File:Ts3_tut_createTattoo_20.jpg|none|frame|Salvare il progetto ]] | ||
#: | #: | ||
| − | # | + | # Now you only have to install your exported [[Sims3pack|.sims3pack]], launch the game and see if everything is working! |
| − | == | + | ==See also== |
| − | *[[Custom pattern|How to create | + | *[[Custom pattern|How to create patterns, tutorial to DDS masks]] |
[[Category: Creation 3]] | [[Category: Creation 3]] | ||
Versione delle 09:55, 20 giu 2010
The patch 1.12/2.7/3.3 introduced the tattoo system in the base game, even if those who purchased The Sims 3 Ambitions have more options and some additional designs.
However, the drawings included in the default game are not that great ....
Currently, the programs created for The Sims 3 have not been updated to Ambitions yet and there isn't a menu option to create a new tattoo ... But with a little effort, we were able to create a tattoo template that you can use to save time.
After a short introduction that explains how we got the procedure for creating new tattoos, we will explain you how to create new tattoos on your own.
Indice
How we get the template file
We used S3pe and TSR Workshop to create the template file used as a base. We opened the file Deltabuild0.package with S3pe. In this file you can find some game resources, in particular some resources added from patches and expansions. Once opened, we arranged them by name and then found those related to tattoos, called uutattoo. First, we exported all resources related to tattoos in a package, then, after opening the new file, we have selected 2 examples designs: uutattoo_butterly and uutattoo_plumbbob. We have created 2 new packages, one for each design.

At this point we have examined whether TSR Workshop was able to open the file as imported, modify and export it as .Sims3pack. After a few testings, we are now ready to explain you how to create new tattoos.
How to create new tattoos
We've already done the hardest part. You only have to download one of these files and use it as a template. First of all, the tattoo system works like the patterns': you might have noticed there are up to 4 different areas to recolor, just like patterns, that correspond to the 4 channels of the image you're going to use.
Template files
We're going to explain it all during this tutorial; as for now, just know that we made two different templates to make your creations easier:
- A one-channel template → that is, a template that has only one recolorable area
- A four-channel template → that is, a template that has four recolorable areas
You can always enable/disable channels while working, but we preferred to start from two different templates. Each of the followings includes two files:
- A .wrk file → this file is a TSR Workshop project, but anyhow according to the version of the program you have, you may experience issues opening it, so we have added a .package version.
- A .package file → is the same file in .package format, that can be opened with S3pe, for example, and read by the game.

These are two tattoos extracted from the game:
- The butterfly (4 channels)
- The plumbob (1 channel)
We have also extracted a few designs from the base game, so this guarantees the compatibility even for those who don't have The Sims 3 Ambitions.
What you'll need
- Une of the templates above
- Adobe Photoshop, Gimp or any other program that can work with channels
- TSR Workshop - more information on how to download it, here.
What to do
- Launch TSR Workshop
- Start a new project by clicking on Create a new project
- Select New import' and click on next
- Now you have to select the file you want to import. The default format is wrk, so if you want to use the package version, you'll have to change the file format from the drop drown menu before selecting the file you want to import, as shown in the picture below.
- In the following screen, you can just click on next without editing anything or you can change the project's name.
- Now it is important to define the features of our new tattoo. Title and Description are up to you and give information to the user, while Unique identifier is needed by the game to recognize the creation properly.
- This means that if you create two files using the same identifier, they overwrite each other, so use proper names, that won't be used by other people.
- We usually write sitename_tattoo_creator_nameORnumber. You can see an example below.
- The new project has been created. Click on OK to confirm.
- The version of TSR Workshop used for this tutorial doesn't manage tattoos, so it's normal to see no previews, as shown in the picture. You'll have two tabs, and in the first one you can see the tatto's properties.
- Since they're tattos, we suggest you to leave everything as it is - (categories and ages), but if you want to create tattoos for females or males only, or that don't appear for formal outfits, you are free to try (we didn't tested these options).
- What you can do is adding a custom preview pictures used by the launcher. We usually create it by placing the tattoo picture and our logo, plus the Workshop symbol, as you can see in the picture.
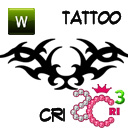
- By clickin on the dots, you can select a picture - we suggest a 128x128 size or anyhow a squared shape. The JPG format is perfect, especially if you use options like Save for the web, that reduce the image's size.
 Inserire una preview personalizzata per il launcher
- Once uploaded, you should have something like this:
 Inserire una preview personalizzata per il launcher
- Now we can go to the most interesting part, the one of designs and colors, that is the Texture tab.
- Each default file is usually available in three versions. In this tab you'll be able to select the other 2 and then click on the X button to remove them or the Copy button to add more.
 Aggiungere o eliminare il numero di stili disponibili
- Now we'll see how to modify the design and change its colors. Keep in mind that these steps must be done for each style - if you keep the file as it is you'll have to do this 3 times, if you add a style 4 times and so on.
- If you expand the Core tab you can find the picture in DDS format.
 Inserire una preview personalizzata per il launcher
- Click on Edit and you'll see a mask as the one below:
 DDS mask da modificare, importare ed esportare
- Click on Export and you'll export the file of the tattoo design in DDS format. You'll have to open and edit it with a graphic program, as explained for patterns. If you want more details about this step, click here.
- As for patterns, then, each channel corresponds to a recolorable part, up to 4. If you want to use only one channel, leave the remaining ones in black. Export the DDS file in the same format used for patterns, 8.8.8.8 ARGB 32bpp.
- for example, take a look at how the butterlfy design works on the four channels:
 Esempio di disegno su 4 canali
- and how a one-channel design works:
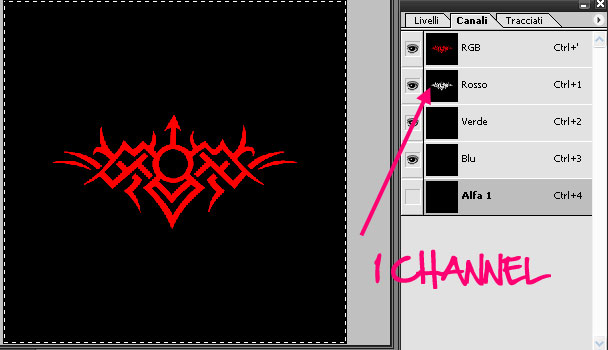 Esempio di disegno su 1 canale
- Once you've created your design, click on Import. Then import your new DDS. This step must be done only once, even if you have several styles: for the others you'll have to use the same mask using the Browse feature, so you can create smaller files. You can also add different designs using different masks and styles, but from CAS you would only see the first style image.
- When you import your new DDS you'll get a message like the one below:
 Confermate di voler importare
- Confirm, it's normal, but the format we suggested is the right one. It is also normal you'll see everything as transparent or with only one part showing. You'll see everything ok in the game.
- After that, you'll get another message box:
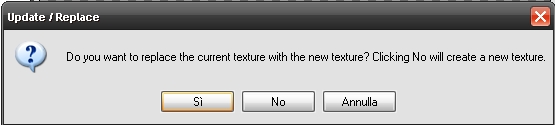 Confermate di voler rimpiazzare la texture esistente
- Confirm again. Here you're asked a confirmation to overwrite the existing texture with your new one.
- Now it's time to manage the predefined colors and channels to enable or disable.
 Selezionate i colori e canali da attivare
- select the colors you want to give to each channel, the in Mask info select those channels you want to enable or disable. In this example, as in the one-channel template of the plumbob, only one channel is enabled as there is only one recolorable part.
 Attivate/disattivate i canali
- Now you're done! You are ready yo export your new tattoo'. In order to do this, go to the File→Export&rar;To Sims3Pack menu.
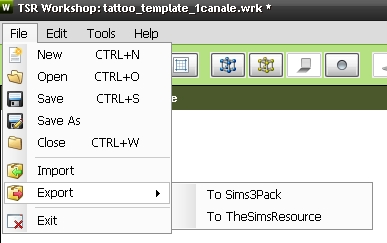 Esportare in .sims3pack
- Before closing the application, we suggest you to save the Workshop project too, as you may want to add further details to what you've done. To do this, go to the File→Save as menu.
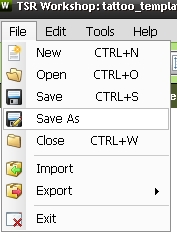 Salvare il progetto
- Now you only have to install your exported .sims3pack, launch the game and see if everything is working!


