How to create a new tattoo: differenze tra le versioni
| Riga 27: | Riga 27: | ||
*'''A four-channel template''' → that is, a template that has four recolorable areas | *'''A four-channel template''' → that is, a template that has four recolorable areas | ||
| − | You can always enable/disable channels while working, but we | + | You can always enable/disable channels while working, but we preferred to start from two different templates. |
| − | + | Each of the followings includes two files: | |
| − | + | *'''A .wrk file''' → this file is a [[TSR Workshop]] project, but anyhow according to the version of the program you have, you may experience issues opening it, so we have added a ''.package'' version. | |
| − | + | *'''A .package file''' → is the same file in ''.package'' format, that can be opened with [[S3pe]], for example, and read by the game. | |
| − | *''' | + | |
| − | *''' | + | |
<div class="down"> | <div class="down"> | ||
| − | *[[File:Winrar_icon.gif]][http://simpedia.sims2cri.com/atfiles/misc/tattoo_template_4channel.rar | + | *[[File:Winrar_icon.gif]][http://simpedia.sims2cri.com/atfiles/misc/tattoo_template_4channel.rar Download the 4-channels template] |
| − | *[[File:Winrar_icon.gif]][http://simpedia.sims2cri.com/atfiles/misc/tattoo_template_1channel.rar | + | *[[File:Winrar_icon.gif]][http://simpedia.sims2cri.com/atfiles/misc/tattoo_template_1channel.rar Download the 1-channel template]</div> |
| − | + | These are two tattoos extracted from the game: | |
| − | * | + | *The butterfly (4 channels) |
| − | * | + | *The plumbob (1 channel) |
| − | + | We have also extracted a few designs from the base game, so this guarantees the compatibility even for those who don't have [[The Sims 3 Ambitions]]. | |
| − | === | + | ===What you'll need=== |
| − | * | + | *Une of the templates above |
| − | *[[Adobe Photoshop]], [[Gimp]] | + | *[[Adobe Photoshop]], [[Gimp]] or any other program that can work with channels |
| − | *[[TSR Workshop]] | + | *[[TSR Workshop]] - more information on how to download it, [[TSR Workshop|here]]. |
| − | === | + | ===What to do=== |
| − | # | + | # Launch [[TSR Workshop]] |
#: | #: | ||
#:[[File:Ts3_tut_createTattoo_02.jpg|none|thumb|600px|Schermata di apertura di TSR Workshop]] | #:[[File:Ts3_tut_createTattoo_02.jpg|none|thumb|600px|Schermata di apertura di TSR Workshop]] | ||
#: | #: | ||
| − | # | + | # Start a new project by clicking on '''Create a new project''' |
#: | #: | ||
| − | # | + | # Select ''New import''' and click on '''next''' |
#: | #: | ||
#:[[File:Ts3_tut_createTattoo_03.jpg|none|thumb|600px|Creare un nuovo progetto tramite import]] | #:[[File:Ts3_tut_createTattoo_03.jpg|none|thumb|600px|Creare un nuovo progetto tramite import]] | ||
#: | #: | ||
| − | # | + | # Now you have to select the file you want to import. The default format is '''wrk''', so if you want to use the ''package'' version, you'll have to change the file format from the drop drown menu before selecting the file you want to import, as shown in the picture below. |
#: | #: | ||
#:[[File:Ts3_tut_createTattoo_04.jpg|none|thumb|600px|Scelta del file da importare]] | #:[[File:Ts3_tut_createTattoo_04.jpg|none|thumb|600px|Scelta del file da importare]] | ||
#: | #: | ||
| − | # | + | # In the following screen, you can just click on '''next''' without editing anything or you can change the project's name. |
#: | #: | ||
#:[[File:Ts3_tut_createTattoo_05.jpg|none|thumb|600px|Confermare o cambiare nome al progetto]] | #:[[File:Ts3_tut_createTattoo_05.jpg|none|thumb|600px|Confermare o cambiare nome al progetto]] | ||
#: | #: | ||
| − | # | + | # Now it is important to '''define the features of our new tattoo'''. '''Title''' and '''Description''' are up to you and give information to the user, while '''Unique identifier''' is needed by the game to recognize the creation properly. |
#: | #: | ||
#:[[File:Ts3_tut_createTattoo_06.jpg|none|thumb|600px|Definire gli attributi del tatuaggio]] | #:[[File:Ts3_tut_createTattoo_06.jpg|none|thumb|600px|Definire gli attributi del tatuaggio]] | ||
#: | #: | ||
| − | #: | + | #:This means that '''if you create two files using the same identifier, they overwrite each other''', so use proper names, that won't be used by other people. |
| − | #: | + | #:We usually write <span class="orange">sitename_tattoo_creator_nameORnumber</span>. You can see an example below. |
#: | #: | ||
#:[[File:Ts3_tut_createTattoo_07.jpg|none|thumb|600px|Esempio di attributi]] | #:[[File:Ts3_tut_createTattoo_07.jpg|none|thumb|600px|Esempio di attributi]] | ||
Versione delle 09:27, 20 giu 2010
The patch 1.12/2.7/3.3 introduced the tattoo system in the base game, even if those who purchased The Sims 3 Ambitions have more options and some additional designs.
However, the drawings included in the default game are not that great ....
Currently, the programs created for The Sims 3 have not been updated to Ambitions yet and there isn't a menu option to create a new tattoo ... But with a little effort, we were able to create a tattoo template that you can use to save time.
After a short introduction that explains how we got the procedure for creating new tattoos, we will explain you how to create new tattoos on your own.
Indice
How we get the template file
We used S3pe and TSR Workshop to create the template file used as a base. We opened the file Deltabuild0.package with S3pe. In this file you can find some game resources, in particular some resources added from patches and expansions. Once opened, we arranged them by name and then found those related to tattoos, called uutattoo. First, we exported all resources related to tattoos in a package, then, after opening the new file, we have selected 2 examples designs: uutattoo_butterly and uutattoo_plumbbob. We have created 2 new packages, one for each design.

At this point we have examined whether TSR Workshop was able to open the file as imported, modify and export it as .Sims3pack. After a few testings, we are now ready to explain you how to create new tattoos.
How to create new tattoos
We've already done the hardest part. You only have to download one of these files and use it as a template. First of all, the tattoo system works like the patterns': you might have noticed there are up to 4 different areas to recolor, just like patterns, that correspond to the 4 channels of the image you're going to use.
Template files
We're going to explain it all during this tutorial; as for now, just know that we made two different templates to make your creations easier:
- A one-channel template → that is, a template that has only one recolorable area
- A four-channel template → that is, a template that has four recolorable areas
You can always enable/disable channels while working, but we preferred to start from two different templates. Each of the followings includes two files:
- A .wrk file → this file is a TSR Workshop project, but anyhow according to the version of the program you have, you may experience issues opening it, so we have added a .package version.
- A .package file → is the same file in .package format, that can be opened with S3pe, for example, and read by the game.
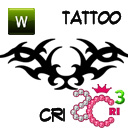
These are two tattoos extracted from the game:
- The butterfly (4 channels)
- The plumbob (1 channel)
We have also extracted a few designs from the base game, so this guarantees the compatibility even for those who don't have The Sims 3 Ambitions.
What you'll need
- Une of the templates above
- Adobe Photoshop, Gimp or any other program that can work with channels
- TSR Workshop - more information on how to download it, here.
What to do
- Launch TSR Workshop
- Start a new project by clicking on Create a new project
- Select New import' and click on next
- Now you have to select the file you want to import. The default format is wrk, so if you want to use the package version, you'll have to change the file format from the drop drown menu before selecting the file you want to import, as shown in the picture below.
- In the following screen, you can just click on next without editing anything or you can change the project's name.
- Now it is important to define the features of our new tattoo. Title and Description are up to you and give information to the user, while Unique identifier is needed by the game to recognize the creation properly.
- This means that if you create two files using the same identifier, they overwrite each other, so use proper names, that won't be used by other people.
- We usually write sitename_tattoo_creator_nameORnumber. You can see an example below.
- Il nuovo progetto e stato creato. Cliccate su ok per confermare.
- Nella versione di TSR Workshop usata in questo tutorial i tatuaggi non sono gestiti, per cui è normale che non vediate nessuna anteprima come dimostrato in figura. Avete due schede e in questa prima vedete le proprietà.
- Poiché sono tatuaggi, vi consigliamo di lasciare tutto così, categorie in cui appare ed età, però se volete creare tatuaggi solo femminili o solo maschili, o che non appaiano in abiti formali, siete liberi di farlo e provare (non abbiamo testato questa possibilità).
- Quello che invece potete fare tranquillamente e inserire una preview personalizzata utilizzata dal launcher. Noi siamo soliti crearla mettendo il disegno del tatuaggio e il nostro logo, più il simbolo di workshop, come vedete in figura.
- Cliccando sui puntini potete selezionare un'immagine, consigliamo le dimensioni 128x128, o comunque una risoluzione quadrata. Il formato JPG va benissimo, specie se usate opzioni come salva per il web che riducono il peso dell'immagine.
 Inserire una preview personalizzata per il launcher
- Una volta caricata vi apparirà così
 Inserire una preview personalizzata per il launcher
- Ora possiamo passare alla scheda più interessante, quella "dei disegni e colori", ovvero alla scheda Texture.
- Ogni file predefinito del gioco solitamente è disponibile almeno in 3 diversi stili. Tramite questa scheda vedete un menù a tendina dal quale potete muovervi fra questi. Se avete intenzione di fornire solo uno stile, potrete selezionare gli altri 2 e poi cliccare sul bottone a forma di X per eliminarli, viceversa, se volete inserirne di più, potete cliccare sul bottone con il simbolo di copia per duplicare uno stile.
 Aggiungere o eliminare il numero di stili disponibili
- Ora vedremo come modificare il disegno e i colori predefiniti per il disegno. Tenete presente che questi passaggi devono essere ripetuti per ogni stile che tenete, se lasciate il file come è in origine quindi dovrete ripetere questi passaggi 3 volte, se aggiungete uno stile 4, etc.
- Alla voce Core se la espandete, trovate l'immagine in formato DDS.
 Inserire una preview personalizzata per il launcher
- Cliccate su Edit e vedrete apparire una maschera come la seguente:
 DDS mask da modificare, importare ed esportare
- Cliccate su Export ed esporterete il file del disegno del tatuaggio in formato DDS. Dovrete poi aprirlo e modificarlo tramite un programma di grafica, esattamente come vi abbiamo spiegato sui pattern. Se volete dettagli su questo passaggio, leggete qui.
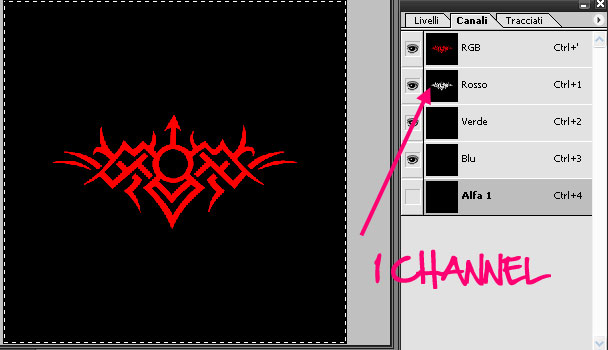
- Come per i pattern quindi, ogni canale corrisponde a una parte ricolorabile, fino a un massimo di 4. Se volete usare solo un canale, lasciate i rimanenti totalmente neri. Esportate i file DDS nello stesso formato usato per i pattern, 8.8.8.8 ARGB 32bpp.
- giusto a titolo di esempio, vi mostriamo come si sviluppa il disegno della farfalla sui 4 canali:
 Esempio di disegno su 4 canali
- e come si sviluppa un nostro disegno su 1 canale:
 Esempio di disegno su 1 canale
- Una volta creato il vostro disegno, tramite cliccate su Import. Importate il vostro nuovo dds. Questo passaggio dovrete farlo solo una volta se avete più stili: per gli altri dovrete richiamare la stessa maschera usando Browse, così potrete creare file meno pesanti. Potreste anche inserire diversi disegni usando diverse maschere e diversi stili, tuttavia dal CAS poi vedreste solo l'immagine del primo stile e non di tutti.
- Quando importerete il vostro nuovo DDS vi apparirà un messaggio simile a questo:
 Confermate di voler importare
- confermate pure, è normale, ma il formato che vi abbiamo consigliato è quello giusto. E' anche normale che vediate tutto trasparente o la sola parte che avete usato come canale 4. Nel gioco vedrete poi tutto giusto.
- Non appena confermato, vi apparirà un ulteriore avviso:
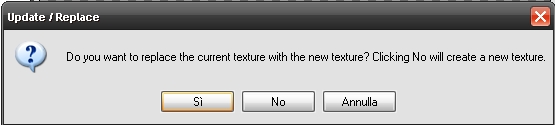 Confermate di voler rimpiazzare la texture esistente
- Dovete confermare nuovamente. In questo caso vi si chiede la conferma per rimpiazzare la texture esistente con la nuova importata.
- Ora dovete occuparvi dei colori predefiniti e dei canali da attivare e disattivare.
 Selezionate i colori e canali da attivare
- selezionate i colori che volete attribuire ad ogni canale, e alla voce Mask info selezionate quali canali volete attivare e disattivare. In quest'esempio, come nel template 1canale del plumbbob, è attivato un unico canale poichè vi è solo una parte ricolorabile.
 Attivate/disattivate i canali
- A questo punto avete fatto! Siete pronti ad esportare il vostro nuovo tatuaggio. Per farlo andate dal menù File→Export&rar;To Sims3Pack.
 Esportare in .sims3pack
- Prima di chiudere, poichè è facile che siano necessarie modifiche a quanto avete fatto, vi consigliamo di salvare anche il progetto di workshop. Per farlo andate dal menù File→Save as.
 Salvare il progetto
- Ora non vi resta che installare il .sims3pack esportato, aprire il gioco e verificare se tutto funziona!


